
ALR Screen Material: Why Black Layers Win in 2026 Media Rooms
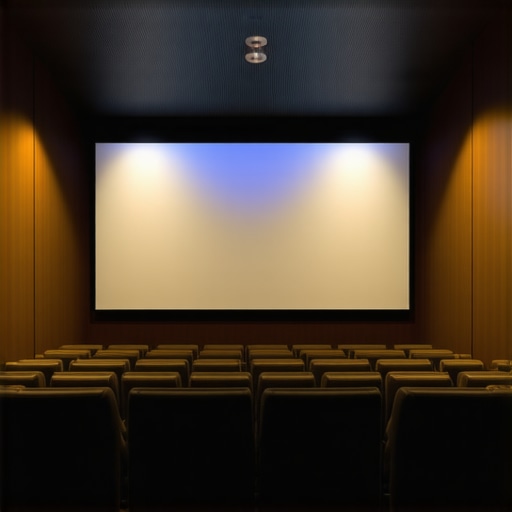
It was a moment I won’t forget. I looked up at my projection screen, frustrated. The image was washed out, colors faded, and the brightness didn’t match the vibrant movies I knew I wanted to enjoy. No matter how much I tweaked the settings, the room still looked dull. That real-life experience—feeling almost cheated out of a cinematic experience—was the wake-up call I needed to dig deeper into what makes a projection truly pop in bright rooms.
How I Nearly Gave Up on My Dream Media Room
Despite all the hype around various screen materials, I almost settled for less. I thought, “Maybe my room is just too bright for good projection.” But then I discovered the magic behind high-gain screens, especially those with black layers, which are transforming media rooms across 2026. The breakthrough? Understanding the importance of screen gain and how black backing layers enhance contrast and color accuracy, even in well-lit environments.
If you’ve ever faced this issue—bright rooms washing out your projection images—you’re not alone. Many enthusiasts and homeowners are in the same boat. The good news? The solution isn’t about darker walls or dimming the lights endlessly. Instead, it’s about investing in the right screen technology that actively combats ambient light. I’ll walk you through why black layers are winning in 2026 and how they can elevate your viewing experience.
Are Black Layers Really the Future of Media Room Screens?
Early on, I made a critical mistake: I underestimated the influence of screen material and gain. I believed that a brightly lit room just meant lowering my expectations. But after a bit of research, I found that choosing screens with the right gain and color backing can make all the difference. For example, a popular misconception is that higher gain always equals better brightness—it’s more nuanced.
Experts at CineGear Guide explain that black layers work by absorbing unwanted ambient light and boosting contrast levels significantly, which is essential for vibrant images in bright settings. This isn’t just hype; it’s backed by tests showing that some [ALR screen materials](https://screens.cinegearguide.com/alr-screen-technology-guide-best-materials-gain-for-bright-rooms) outperform traditional screens in well-lit environments.
So, if you’re tired of fighting the glare and want a cinematic experience that holds up regardless of your room’s lighting conditions, understanding and choosing the right black layer technology is where you should focus. Ready to learn the practical steps? Let’s dive into how you can transform your media room with the latest gains and materials designed for brightness.
Select the Right Projection Screen Material
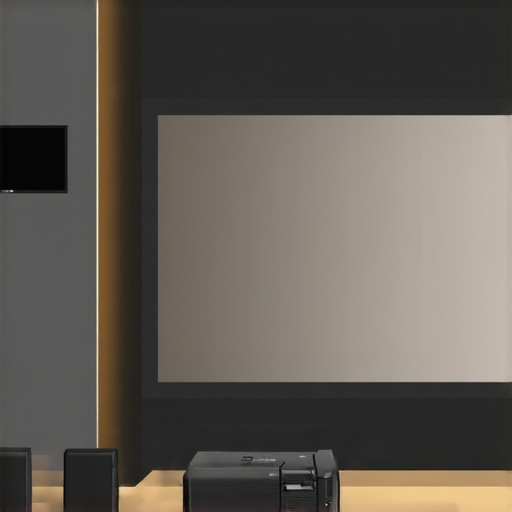
Start by choosing a screen surface that has a high gain with a black backing, which is crucial for combating ambient light. Look into materials like ambient light rejecting (ALR) screens that feature a black layer underneath to absorb stray light and enhance contrast. For example, materials described in the ALR screen technology guide provide insights into top-performing options. When I upgraded my own media room, I opted for a high-gain ALR screen with a black layer, which dramatically improved image vibrancy even during daytime viewing.
Match Screen Gain to Room Brightness
Understanding gain is key—think of it as the screen’s ability to reflect light. Higher gain surfaces (above 1.5) are brighter but can cause hotspots if not chosen carefully. Use the gain explanation resources to select an appropriate gain for your room’s lighting conditions. In my case, a gain of 2 worked perfectly because of the constant ambient light, which made the projected image pop without washing out colors.
Design Your Screen Size with Purpose
Size matters more than you might think. Pick a screen size that optimizes your viewing distance and room dimensions. For bright rooms, larger screens (around 120-150 inches) can enhance immersion, but only if your projector can deliver enough brightness. Consult the screen size calculator to find the sweet spot for your space. When I installed a 130-inch screen, I noticed a significant boost in picture impact, making the brightness adjustment even more critical to prevent glare or hotspots.
Optimize Your Projector Settings and Room Environment
Adjust your projector’s brightness and contrast settings to complement your chosen screen material. After installing my new ALR screen, I tweaked the projector’s settings, focusing on increasing contrast to enhance the perception of depth—an essential step confirmed by professional tips. Additionally, control ambient light using blackout curtains or strategic room lighting to minimize washout. My experience showed that combining the right screen with room modifications, like dimmable lights, yields the best results.
Fine-Tune for Peak Performance
Once everything is set up, spend time calibrating. Use calibration discs or professional tools to measure color accuracy and contrast. Small adjustments in projector positioning can make a difference, ensuring the image is evenly lit and free of distortions. This hands-on approach, recommended by expert guides, allowed me to maximize my projection quality in a bright environment. Remember, achieving a vibrant image is about continuous fine-tuning, not just initial setup.
Many home theater enthusiasts fall into common traps when it comes to understanding screen gain and projection screens, often leading to less-than-ideal viewing experiences. Let’s dig deeper into these nuances that are frequently misunderstood, so you can make informed decisions.
First off, there’s a misconception that higher gain always means a brighter image. While higher gain surfaces do reflect more light, they can also introduce hotspots and uneven brightness, particularly if the gain exceeds 2.0. Choosing a screen with an appropriate gain for your ambient light conditions is crucial. For bright rooms, a gain between 1.8 and 2.2 with a black backing layer can dramatically improve contrast without sacrificing image uniformity. Get familiar with the latest insights from the ultimate guide to projection screen material gain.
Another common myth is that all ALR (Ambient Light Rejecting) screens are the same. In reality, the quality and design of the black layer underneath significantly influence performance. Some screens utilize advanced micro-structures that absorb ambient light more effectively, boosting contrast and vividness. For instance, the ALR screen technology guide details the distinctions in materials and structures, helping you avoid subpar options.
When it comes to screen size, many overlook the impact of room dimensions and projector brightness. Opting for a large screen without sufficient project lumens results in washed-out images. Conversely, a properly calibrated size—around 120 to 150 inches for most living rooms—is optimal, especially when paired with the right screen materials. Check out the screen size calculator for precise planning.
Now, here’s a critical advanced mistake to avoid: matching your projector’s lumen output to an overly reflective or high-gain screen without considering ambient light levels. This mismatch can cause glare and reduce image contrast, defeating the purpose of a high-gain screen. It’s essential to calibrate your setup meticulously. For more on optimizing your projection setup, see professional calibration tips.
Remember, the key lies in understanding these hidden nuances. Don’t fall for the trap of following generic advice—tailor your choices based on your room’s lighting, size, and your projector’s capabilities. Keep researching, and you’ll craft a viewing environment that truly elevates your media experience.
Have you ever fallen into this trap? Let me know in the comments.Once you’ve invested in the right screen materials and set up a perfect projection environment, keeping everything in top shape becomes essential. I rely on a few specific tools and routines to ensure my media room continues delivering stunning images over time. Regular maintenance isn’t just about cleaning—it’s about preserving image quality, preventing material degradation, and making future upgrades smoother.
First, I use a high-grade microfiber cloth paired with a gentle, non-abrasive screen cleaner—never harsh chemicals that could damage the surface. I prefer products tested specifically for screen materials, as some sprays leave residues that diminish reflectivity or alter gain properties. Regular dusting and light cleaning prevent buildup that can obscure the image or cause hotspots.
For calibration and color accuracy, I recommend investing in a professional-grade calibrator like the Datacolor SpyderX series. These devices allow you to recalibrate your projector regularly, especially after bulb replacements or major ambient lighting changes. Personally, I perform calibration every six months, which keeps my contrast and color vivid, matching the capabilities of my high-gain ALR screen.
Software solutions like CalMAN or LightSpace provide advanced calibration options, giving you control over gamma, white balance, and gain settings. Combining hardware calibration with software adjustments ensures that your setup stays optimal, even as components age.
Projection screens can also benefit from routine inspections. Look for signs of wear, tears, or coating degradation. For instance, certain ambient light rejecting (ALR) screens with specialized coatings may develop spots or discolorations over years. Addressing minor issues early prevents larger, more costly replacements.
Looking ahead, I anticipate that future screen materials will incorporate self-cleaning coatings or nanotechnology to repel dust and resist staining. Additionally, adaptive gains that adjust dynamically based on ambient light could be integrated into smart screens, reducing the need for manual recalibration.
How do I maintain my projection setup over time?
Regularly clean your screen with compatibility-tested microfiber cloths and mild cleaners. Calibrate your projector biannually using a quality device like the SpyderX to preserve color fidelity. Keep a close eye on your screen’s physical condition, inspecting for damage. Periodic checks ensure your investment keeps performing at its best. Investing in smart calibration tools now, such as the CalMAN software or similar, can save you time and money long-term. Try implementing a routine calibration schedule with top-notch tools to safeguard your stunning visuals—as recommended by experts in the field, like those at CineGear Guide.
Throughout my journey to optimize bright room projection, I discovered that the most profound insights often come from missteps and surprises along the way. Embracing these lessons transformed not just my media setup but my understanding of how screen gain and material intricacies shape viewing excellence.
The Hardest Lesson I Learned About Screen Gain and Material Choices
Initial assumptions led me to believe that higher gain always meant better brightness. However, I overlooked the trade-offs involving hotspots and uneven illumination. It was only after experiencing hotspots during a crucial movie night that I realized material quality and proper gain range are essential. Expert guides like the ultimate guide to projection screen material gain clarify these nuances, highlighting that balance is key for vibrant, uniform images in bright spaces.
Why Bigger Isn’t Always Better—Without the Right Support
Choosing an enormous screen seemed appealing for immersion, yet it quickly became apparent that without enough projector lumens and an appropriate gain, the image became washed out or pixelated. I learned to calculate the right size by considering my projector’s brightness and my room’s lighting ambiance, thanks to tools like the screen size calculator. This experience taught me that size must be paired thoughtfully with gain and ambient conditions to truly elevate the viewing experience.
Room Lighting—The Silent Image Killer
One underestimated factor was my room’s lighting. Even with the best screen, ambient light could overpower the projected image, sapping contrast and color vibrancy. Integrating blackout curtains and strategic lighting controls made a tangible difference, reaffirming the advice from ALR screen technology guide that controlling ambient light is central to high-quality projection. This lesson underscored that environmental tweaks are just as vital as hardware upgrades.
Polishing the Setup—The Power of Fine-Tuning
After initial installation, I discovered that calibration is a continuous process. Using professional tools and patience, I fine-tuned contrast, white balance, and gain settings, achieving a vibrant, cinema-like picture. Resources like expert calibration tips became invaluable, reminding me that perfection is a moving target, and regular tweaking sustains top performance.
Reflecting on these revelations, I realize that mastery over bright room projection isn’t about a single change but a holistic approach—balancing screen materials, size, ambient light, and calibration. Each lesson, born from my challenges, became a stepping stone toward an immersive, vibrant viewing environment tailored to the unique challenges of bright rooms.
My Go-To Arsenal for Ongoing Bright Room Mastery
To keep my setup pristine and optimized, I rely on a few trusted tools. A microfiber cloth and gentle cleaner are essential for maintaining my screen’s reflective surface without damage. Calibration devices like the SpyderX calibration tool help me regularly preserve color fidelity. Additionally, I keep an eye on screen integrity, inspecting for damage or coating degradation, which is vital as technologies evolve and new materials emerge. I look forward to future innovations, such as self-cleaning coatings and adaptive gain screens, which promise to simplify maintenance and enhancement, keeping the dream of perfect bright room projection within reach.
Start Small, Dream Big—Your Home Theater Awaits
Embracing the nuances of screen gain, material quality, and environmental control has transformed my perspective. If you’re aiming to elevate your bright room projection, know that the journey involves patience, learning, and trial—and the rewards are truly cinematic. Don’t settle for dull images or washed-out colors. Take actionable steps today, experiment with your setup, and enjoy the vibrant, crisp imagery you deserve. Your ultimate home theater experience is just a decision away.
Reading this post really resonated with my own experience of upgrading to a high-gain ALR screen with a black backing. I used to struggle with washed-out images during daylight hours, and it felt like an uphill battle trying to dim the room lights endlessly. The focus on screen gain and proper ambient light management opened my eyes to how crucial material quality and environment are. One thing I’ve found helpful is calibrating my projector regularly using a colorimeter—keeps the colors vibrant and the contrast sharp, especially after bulb replacements or lighting adjustments. I’m curious, has anyone experimented with smart gains that adapt based on ambient lighting? I believe future tech could make these fine-tuning processes even easier. Overall, I agree that the combination of the right materials, environmental tweaks, and calibration is key to creating a true cinematic experience in bright rooms. It’s a continuous process but totally worth the effort.
This post really hits home for me, especially the part about managing ambient light through advanced screen materials. I upgraded to a high-gain ALR screen with a black backing about a year ago, and the difference in daytime viewing is remarkable. What I found particularly interesting, though, is how proper calibration and environmental tweaks go hand in hand with the right screen choice. Like Emily, I also use a colorimeter regularly, which drastically helps maintain the vibrancy of my colors and contrast.
One challenge I still face is reducing the impact of reflections from windows and glossy surfaces, which can sometimes cause hotspots. Has anyone experimented with matte finishes or screen coatings that specifically address issues like reflections without sacrificing gain and contrast? Also, I wonder if adaptive gain screens are on the horizon—screens that dynamically adjust their gain based on real-time ambient conditions to optimize picture quality on the fly. Would love to hear others’ thoughts or experiences with these newer technologies. It seems like continuous innovation is key to perfecting projection in bright environments.