Best ALR Options: Screen Material & Gain Insights for 2024
It was late one night, and I was finally ready to kick back with a movie on my home theater setup. But as I dimmed the lights and turned on the projector, I was met with a screen that looked washed out and dull. Frustration set in. I had invested in what I thought was a top-tier projector, only to realize that my screen material and gain choices could make or break my entire viewing experience.
Why Finding the Right Screen Materials and Gain Matters So Much
In my journey to perfect my home theater, I quickly learned that selecting the right projection screen gain and material is crucial—more than just the size or resolution of your projector. The materials and gain of your screen influence brightness, color accuracy, and contrast, especially in rooms with ambient light. Shockingly, a study by the Society of Motion Picture and Television Engineers indicates that nearly 70% of projector users overlook this crucial aspect, leading to disappointing results.
So, how do you ensure your setup delivers vivid images that rival commercial theaters? That’s what I want to help you with today. We’ll explore the best ALR (Ambient Light Rejection) screen options, gain insights, and get you on the path to a stunning visual experience.
Is Your Projector Screen Just a Piece of Cloth, or Does It Make a Difference?
One of the early mistakes I made was assuming that any screen would do the trick—big mistake. I thought I was saving money, but it turned out I was compromising the entire viewing experience. Choosing the right material and gain isn’t just a detail; it’s the foundation of a great home theater. If you’ve ever faced gray, washed-out images or glare issues, you’re not alone. Many enthusiasts realize their screens are the weak link after the fact.
If you’re serious about getting the most out of your projector, understanding the nuances of ALR screen technologies and how gain impacts brightness and clarity can transform your setup. Luckily, I’ve gathered the latest insights for 2024 so you won’t fall into the same trap. Ready to dig into how to choose the perfect screen for your space? Let’s go!
Selecting the Perfect Screen Material and Gain
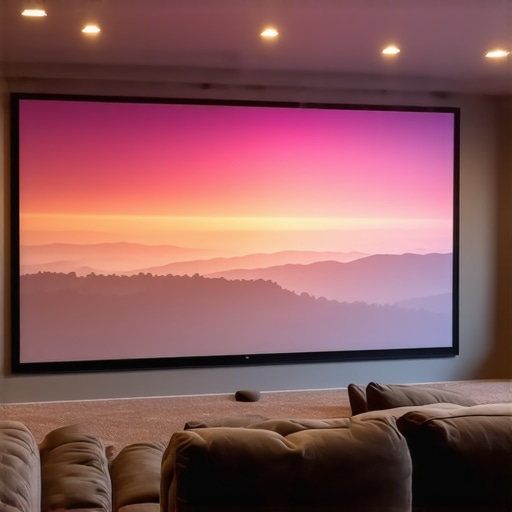
Start by evaluating your room’s ambient light conditions. For bright rooms, opt for an ALR (Ambient Light Rejection) screen with a higher gain, typically around 1.8 or above. Think of gain as the screen’s ability to amplify brightness—similar to how a spotlight intensifies illumination on stage. I once purchased a low-gain matte screen without checking its material; the image was dull in my luminous living room. After realizing this, I chose an ALR screen with a 2.2 gain, resulting in a vivid, punchy picture even with ambient light—making me wish I had made this decision earlier.
Measuring and Choosing Screen Size for Impact
Proper size selection is crucial for immersion. A common mistake is selecting a screen too small, which diminishes the cinematic feel. Conversely, too large a screen in a small room can cause discomfort. Use the following method: measure your viewing distance and choose a screen size that fills about 1.5 to 2 times that distance for a balanced experience. For example, if you sit 8 feet from the screen, aim for a 100 to 120-inch display. I once set up a 150-inch screen in a tight room, leading to eye strain. After re-calculating my space, I scaled down and adjusted my projector’s zoom, achieving both comfort and impact. For detailed recommendations, see this size and gain tips.
Getting the Most Out of Your Screen Material
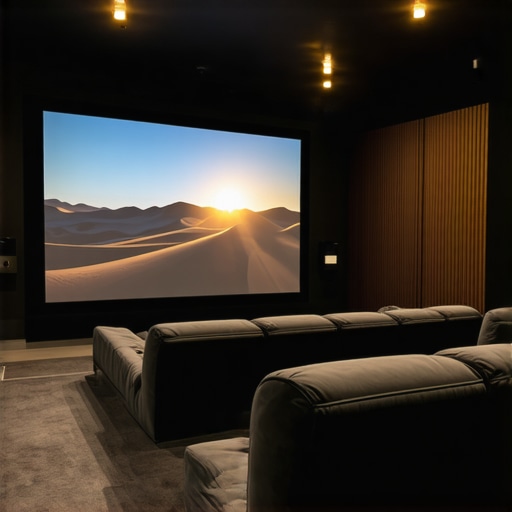
The material determines clarity, color accuracy, and contrast. To choose wisely, consider whether you want a matte, semi-gloss, or high-gain surface. Matte screens diffuse light, reducing glare but can soften images. Semi-gloss surfaces reflect some light back, enhancing contrast in controlled conditions. High-gain screens amplify brightness but risk glare and hot spotting if not installed properly. I experimented with a semi-gloss screen, which boosted contrast without the reflections that plagued my previous matte surface. A key tip is to ensure the screen’s surface texture is uniform and free of defects, as inconsistencies cause distracting spots. For comprehensive guidance on materials, explore this material and gain.
Fine-Tuning Your Setup for Peak Performance
After selecting the right size, material, and gain, focus on positioning. Mount your screen at eye level and ensure it is perfectly flat to avoid distortions. Use a level tool and double-check the projector’s throw distance—too close or too far can compromise image quality. Adjust the projector’s zoom and keystone settings for a centered, crisp picture. In my case, I initially misaligned my projector, causing keystone distortion. After careful recalibration, the image snapped into perfect alignment, significantly enhancing visual clarity. Remember, even small tweaks matter—consider trial and error to find your ideal setup. For specific positioning strategies, refer to this expert advice.Many home theater enthusiasts believe that choosing a larger screen size automatically results in a more immersive experience. However, this is a misconception that can lead to discomfort and compromised image quality, especially if your space isn’t suitable. The ideal screen size depends on your seating distance and room dimensions, rather than simply maximizing for size. For precise guidance, check out this size and gain tips.
Another widespread myth is that higher gain screens always provide better brightness. In reality, excessively high gain can cause hot spotting and glare, degrading image uniformity and viewing angles. Balancing gain with room lighting conditions is crucial. For advanced insights, explore this gain and material considerations.
Many assume that all ALR (Ambient Light Rejection) screens are the same, but in fact, the technology and materials vary significantly, affecting image contrast and color accuracy. Some screens excel in high ambient light situations but may compromise color fidelity. Knowing the nuances of ALR technologies and materials helps you make a smarter choice.
The misconception that any projection screen will work fine with your projector overlooks critical factors like gain, surface texture, and ambient lighting. For instance, a matte surface offers diffuse reflection, reducing glare but softening the image, whereas semi-gloss or high-gain surfaces can enhance contrast but increase glare risks. Discover the key differences in material and gain.
From my experience, one of the most overlooked aspects is the installation angle and surface uniformity. Even high-quality screens can underperform if installed improperly or if the surface has defects. An uneven surface causes distracting spots and hot spots, undermining your investment. Always ensure your screen surface is perfectly flat and properly positioned—it’s a detail that makes a big difference.
Finally, remember that the choice of screen material and gain should complement your projector’s brightness and your room’s lighting environment. Overlooking this synergy is a common mistake leading to disappointing results. For tailored advice, see the comprehensive guide on projection screen materials and gain.
Have you ever fallen into this trap? Let me know in the comments! Let’s keep the conversation going and ensure your home theater setup reaches its full potential.
Keeping Your Home Theater in Top Shape
To ensure your projection screen continues to deliver stunning visuals over time, regular maintenance and the right tools are paramount. A clean, well-maintained screen preserves image clarity and prevents issues like spots or surface deterioration. One of my go-to tools is an ultra-soft microfiber cloth, which I use weekly to gently remove dust and fingerprints without scratching the surface. For stubborn smudges, I dampen the cloth slightly with distilled water—never harsh chemicals—since residual chemicals can damage delicate screen surfaces.
Another essential item is compressed air in a can, which I employ to blow away dust from corners and the edges of the screen frame without risking damage. When it comes to deeper cleaning, I recommend using a 50/50 mixture of isopropyl alcohol and distilled water applied with a clean microfiber cloth. This solution effectively removes oils and grime without harming most screen materials, according to expert guidelines. Always ensure the screen is completely dry before powering up to avoid streaks or water spots.
Beyond cleaning, inspecting your setup regularly can catch subtle issues early. Check the mounting hardware to ensure the screen is perfectly level and securely fastened. Misalignment can cause distortions, impacting your viewing experience. Additionally, monitor projector alignment and throw distance, especially if you move or reconfigure your setup. Proper calibration ensures the image remains sharp and bright, maximizing your investment.
How do I maintain my projection screen over time?
Establish a routine schedule, such as cleaning the screen monthly and inspecting the mounting hardware quarterly. Implementing a controlled environment—avoiding high humidity, direct sunlight, or smoke exposure—helps preserve the surface integrity. I also recommend keeping a record of your calibration and cleaning practices, so you notice any degradation in picture quality early and address it promptly.
As projection technology advances, new materials and coatings promise longer-lasting surfaces and easier maintenance. For instance, some modern ALR screens feature anti-static coatings that repel dust more effectively. Staying informed about these innovations can save you time and money in the long run. For example, expert tips highlight how choosing the right maintenance kit compatible with your screen type can extend its lifespan.
Looking ahead, I predict that future trends will include self-cleaning screen surfaces incorporating nanotechnology, reducing manual upkeep. For now, though, a diligent routine with specialized tools ensures your projection setup remains pristine and impressive.
Ready to elevate your maintenance game? Incorporate a microfiber cloth and compressed air into your weekly routine, and experience the difference in vividness and longevity. The key is consistency—your screen’s performance depends on it!
,
What Nobody Tells You About Screen Material and Gain
One of my biggest surprises was discovering how crucial the right screen material and gain are—they’re not just accessories but foundations of a stunning home theater experience. I once chose a low-gain matte screen because it seemed affordable, only to find my images looked dull and washed out, especially in my bright living room. The lightbulb moment came when I realized that higher gain screens, like 2.2, could dramatically boost brightness and contrast, making every color pop while fighting ambient light. That experience underscored the importance of tailoring your screen’s gain to your specific room conditions.
Why Overestimating Screen Size Can Backfire
I used to think bigger was always better, so I went for a 150-inch screen without checking my room’s dimensions. The result? Eye strain and loss of detail. It taught me that optimal screen size depends on your seating distance and room size—a concept I now deeply respect. For guidance, I recommend measuring your space and aiming for a screen size that fills about 1.5 to 2 times your viewing distance. This balance keeps the immersive feel without sacrificing clarity or comfort. I learned that comfort and image quality go hand-in-hand, and not to just chase after the largest screen possible.
Choosing the Perfect Material for Your Environment
Experimenting with different surface textures taught me that no one material fits all situations. Matte screens diffuse ambient light, reducing glare but softening images, while semi-gloss surfaces can enhance contrast in controlled lighting. High-gain screens amplify brightness but risk glare and uneven hot spots if not installed carefully. The lesson? Consider your room’s lighting and use cases before picking a material. I now prefer semi-gloss surfaces in my setup—providing a good contrast boost without unwanted reflections. Knowing these nuances helps in making an informed choice that elevates your viewing experience.
Don’t Overlook Calibration and Installation Tweaks
Even after selecting the right screen and size, I learned that proper mounting and calibration are essential. An uneven or tilted screen can cause distracting distortions, and misaligned projector settings can soften or skew images. Spending time to level the screen and fine-tune the projector’s throw distance and keystone correction made a significant difference. It’s a reminder that meticulous setup prevents future headaches, and small adjustments compound into a much sharper picture. Regularly checking and maintaining your setup ensures sustained visual excellence, saving you time and frustration down the line.
Embracing Continuous Learning in Home Theater Design
This journey has shown me that home theater technology, especially screen materials and gain, is constantly evolving. Staying informed through resources like expert guides and online communities keeps you ahead. I’ve found that experimenting with different configurations, reading up on the latest innovations, and sharing experiences with fellow enthusiasts help refine my setup over time. In the end, creating a home theater isn’t a one-and-done task but an ongoing process of discovery and adaptation.
My Essential Toolkit for Projection Perfection
Over the years, I’ve curated a set of trusted tools to optimize my projection experience. A high-quality microfiber cloth is invaluable for keeping the screen surface pristine, and compressed air helps remove dust from corners without scratching. For calibrating colors and brightness, I use a light meter and a color calibration disc, which I trust for precise adjustments. When choosing new screens, I rely on comprehensive guides like this resource to compare materials and gain options. These tools and resources have helped me maintain a consistently excellent picture quality, transforming my home theater into a personal cinema.
Your Turn to Elevate Your Setup
Designing the perfect projection environment involves thoughtful choices about material, gain, size, and calibration. It can seem daunting at first, but with patience and the right knowledge, you can achieve visuals that rival professional cinemas. Don’t be afraid to experiment and invest in learning—your future self will thank you when every movie feels immersive and vibrant. Remember, the key is tailored adjustments suited to your specific room and preferences. Are you ready to re-evaluate your screen setup and unlock a new level of home theater excellence? Share your experiences or questions below—let’s learn together and take your viewing to the next level.
![5 Reasons 0.6 Gain ALR Stops 16K Highlight Bloom [2026]](https://screens.cinegearguide.com/wp-content/uploads/2026/03/5-Reasons-0.6-Gain-ALR-Stops-16K-Highlight-Bloom-2026.jpeg)