Projection Screens: Ultimate Guide to Screen Gain, Material & Size
I vividly remember the moment I realized my home theater wasn’t delivering the cinematic experience I craved. Despite investing in a high-quality projector, my picture looked washed out, and colors seemed dull. It was as if I was watching a movie through a foggy window. That frustrating experience was a lightbulb moment—understanding that the screen’s properties, especially gain and material, are just as crucial as the projector itself.
The Hidden Power of the Right Projection Screen
Choosing the perfect projection screen can feel overwhelming. With options like ALR (Ambient Light Rejection) screens, a variety of materials, and different sizes, many enthusiasts and even seasoned installers get lost in the details. But here’s the truth: your great projector deserves a screen that complements it perfectly. Getting this right can significantly improve brightness, color accuracy, and contrast, transforming your room into a true home theater.
Is Bigger Always Better for Your Screen?
One common misconception is that a larger screen guarantees a more immersive experience. However, size isn’t the only factor—screen gain, material, and room lighting play vital roles. For instance, a massive screen with low gain might appear dim in a bright room, defeating its purpose. Early in my journey, I made the mistake of choosing a huge screen without considering these factors, and the results were disappointing. For expert advice on balancing size with gain and material, I recommend checking out [this comprehensive guide](https://screens.cinegearguide.com/alr-screen-options-ultimate-guide-to-gain-material-size-in-2024). This resource helped me understand how gain impacts brightness and clarity, especially in rooms with ambient light. Understanding these aspects allows you to select a screen that delivers vibrant visuals without needing a dark room, which is essential in everyday living spaces.
Choose the Right Screen Size for Your Space
Measure your viewing distance first—aim for a screen width that allows you to sit comfortably without craning your neck or feeling overwhelmed. For example, if you sit about 9 feet from the wall, a 100-inch diagonal screen typically provides an immersive experience. Remember, larger isn’t always better if your room can’t accommodate it, leading to a strained viewing experience. Use a calculator or consult a guide like this sizing resource to match your space precisely.
Select a Screen Material That Enhances Brightness and Colors
Picking the right material is crucial, especially in rooms with ambient light. Think of your screen as a canvas—some materials reflect light evenly, while others absorb or reject unwanted glare. For bright rooms, materials with high gain and ambient light rejection (ALR) capabilities are ideal. For instance, a screen with a gain of 1.3 to 2.0 increases brightness, making each image pop without washing out colors. Dive into this guide to find the best materials suited for your setup.
Match Gain Levels to Room Lighting Conditions
Gain indicates how much light a screen reflects. Think of gain as an amplifier—high gain screens (above 1.5) boost brightness but are more sensitive to viewing angles, causing washed-out images if you’re off-center. Low gain screens (around 1.0) are more forgiving but may produce dimmer images in well-lit rooms. If your room has significant ambient light, opt for a high gain, ALR-enabled screen to maintain vivid images, especially during daytime viewing. Use this resource for detailed gain considerations.
Consider an Ambient Light Rejection Technique
If your environment can’t be totally darkened, ALR screens are game-changers. Imagine walking into a room with sunlight streaming in—you want your screen to reject ambient light, much like sunglasses block out glare. These specialized screens use optical coatings or micro-structures to divert ambient light while reflecting the projector’s image. Think of it as a one-way glass: your projector communicates directly with the screen, but external light is deflected away. For a more technical dive, check this guide.
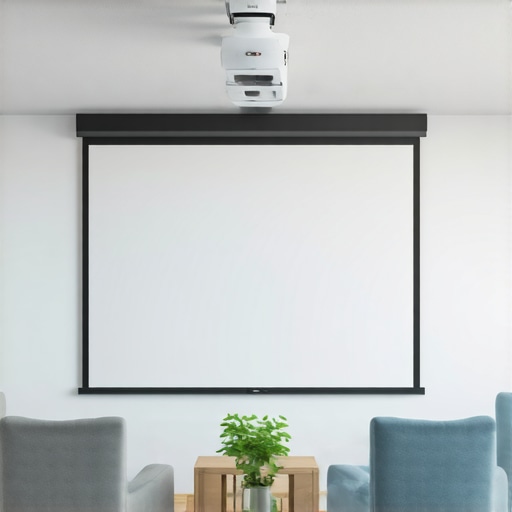
Incorporate Proper Room Setup and Positioning
Position your screen at eye level when seated and ensure the projector is aligned centrally to prevent keystone distortion. Use a leveler and measurement tape to keep things precise. As I learned from my early mistakes, mounting the screen slightly lower improved viewing comfort, reducing neck strain and enhancing immersion. Adjust room lighting—blackout curtains can help, but if you prefer natural light, a high-gain, ALR screen will serve you better. Remember, the environment’s lighting directly influences your choice of gain and material. Leverage this installation guide for expert positioning tips.Many home theater enthusiasts believe that a higher screen gain always translates to a brighter, sharper image, but this is a common misconception that can lead to costly mistakes. The truth is, selecting the right gain depends heavily on your specific environment and viewing angles. Oversized gains, while enticing for brightness, often introduce significant viewing angle limitations, causing washed-out images for off-center viewers. In fact, the experts at Cinegear Guide highlight that high-gain screens, typically above 1.5, are better suited for dedicated dark rooms, not versatile living spaces where ambient light is present. Don’t fall into the trap of equating gain solely with brightness; instead, consider your room’s lighting and seating arrangement—this nuanced approach ensures optimal image quality. A mistake I frequently see is pairing high-gain screens with projectors that lack sufficient lumens, resulting in disappointingly dull visuals. To get the most out of your setup, delve into detailed guides on gain and material selection, such as this comprehensive article on ALR screen technology and gain. When it comes to projection screens, size matters, but size without considering gain can be an expensive oversight. Choosing a too-large screen with inappropriate gain can lead to uneven brightness and color inaccuracies, especially in rooms with ambient light. This is why expert tips emphasize balancing screen size, gain, and environment for a seamless experience. Additionally, many assume that all projection screens are created equal, but material choice plays a crucial role. For bright rooms, opt for materials with high reflectivity and ambient light rejection capabilities—these are game-changers in non-dark environments. Remember, the goal is to reflect enough light without sacrificing color fidelity or viewing angles. As I’ve learned through experience, selecting the right combination of screen material and gain can elevate your viewing from ordinary to extraordinary. For in-depth insights, check out the guide on best materials and gain tips, which explains how to optimize your screen for various lighting conditions. A final common pitfall involves neglecting room layout; positioning your screen and projector improperly can negate even the best choices. For example, placing your screen too high or low can affect viewing angles, and misaligned projectors can cause keystone distortion. Proper setup maximizes the benefits of your carefully chosen screen properties—so don’t skip this step. To sum up, mastering the nuances of screen gain, material, and size requires a blend of technical understanding and tailored adjustments. Don’t rely on generic advice—your environment matters. And remember, avoiding these pitfalls means you’ll enjoy stunning visuals without the typical frustrations. Have you ever fallen into this trap? Let me know in the comments.Keeping your home theater setup performing at its best requires more than initial installation; regular maintenance and the right tools are essential for long-term success. First, cleaning your screen periodically is crucial—use a microfiber cloth and a gentle lens cleaner to remove dust, fingerprints, and smudges without damaging the material. For screens with high gain or ALR coatings, avoid harsh chemicals which can degrade the reflective surface over time. I personally rely on a soft, anti-static cloth combined with a specialized screen cleaning solution recommended by manufacturers, ensuring that the reflective properties remain intact and vibrant. Preventative measures like avoiding exposure to direct sunlight or high humidity help preserve the integrity of the screen material and its gain characteristics. When it comes to tools, a digital lux meter can be invaluable—by measuring ambient light and screen reflectivity, you can fine-tune your setup for optimal brightness and contrast, especially in rooms with fluctuating lighting conditions. Having a level and measuring tape on hand also ensures your screen remains perfectly aligned, preventing distortion and maintaining image clarity. Predictively, as display technology advances with more durable materials and self-cleaning coatings, I believe the need for hands-on maintenance will gradually decrease, allowing enthusiasts to focus more on calibration and content quality.
How do I maintain my projection screen over time?
Incorporating UV filters or protective coverings can shield your screen from environmental damage, and periodically inspecting for signs of wear ensures early detection of deterioration. I’ve found that establishing a routine—say, cleaning and inspection every three to six months—significantly extends the lifespan of my screen, keeping images bright and colors vivid. For more detailed guidance on preserving your setup, check out expert articles like the comprehensive resources on ALR screen technology and maintenance tips. Additionally, upgrading your tools, such as investing in a high-quality calibration device, can fine-tune your image over time, ensuring consistent performance even as your environment or equipment changes. As my experience has shown, selecting resilient materials and maintaining a regular cleaning schedule are key to maximizing your investment and enjoying flawless visuals for years to come. Don’t hesitate to test out a digital lux meter to precisely measure ambient light—this small step can make a noticeable difference in your viewing experience.
From my journey into home theater optimization, I’ve learned that the devil is truly in the details. One of the most overlooked aspects is understanding how your screen’s gain and material selection can make or break your viewing experience. Don’t assume that bigger always means better; the right size, combined with appropriate gain and material, transforms a decent setup into a cinematic masterpiece.
Lessons That Can’t Be Found in Basic Guides
- High gain isn’t always a shortcut to brightness: It might boost image luminance, but it can also limit your viewing angles, causing washed-out or dull images for off-center viewers. I discovered this the hard way, by investing in a high-gain screen for my bright room—only to find my family struggling to see details from the sides. The key is balancing gain with room layout, which I now understand better after exploring expert resources like this guide.
- Material choices are more critical in ambient light: A matte or low-gain material might seem appealing for a dark room, but in daylight, high-reflectivity surfaces with ambient light rejection (ALR) coatings can save your viewing experience. I learned that selecting an incompatible material in my living room led to washed-out colors, prompting a deep dive into materials suited for bright environments. For insights, I recommend this resource.
- Screen size isn’t an isolated decision: It must align with your seating distance and room dimensions. A gigantic screen in a small space can cause discomfort and eye strain, negating its immersive value. My realization came after trying to push for size without considering room ergonomics, a mistake corrected by using practical sizing calculators like this guide.
My Favorite Tools for the Perfect Projection Setup
- Calibration tools: A digital lux meter ensures ambient light levels are optimized, preventing glare and washed-out images. My setup improved dramatically once I measured and adjusted my environment based on real-time data.
- Measurement accessories: Levelers and tape measures keep your screen aligned and at the correct height, avoiding distortions and ensuring uniform image quality. These simple tools prevented costly errors during my install process.
- Expert reading materials: Books like this comprehensive guide helped me navigate complex choices, saving time and money by making informed decisions upfront.
Your Journey Starts Now: Embrace the Details
Mastering the art of projecting a cinematic experience in your home involves understanding and applying nuanced knowledge about gain, material, sizing, and room setup. Small adjustments can have a significant impact, turning a good home theater into an extraordinary one. So, take the insights from this article as your starting point, and don’t hesitate to experiment—each room and projector setup has its unique personality. With patience and the right approach, you’ll soon enjoy vibrant, immersive visuals that rival commercial theaters. How will you tweak your setup next to get closer to cinema-quality visuals? Let me know in the comments!